QGTunnel: Static IPs for Database Connections, FTP, SFTP, and Other TCP Traffic

QuotaGuard Engineering
February 18, 2026
5 min read
Pattern

HTTP proxy works great for API calls. But if you need a static IP for a database connection, an FTP server, or any other TCP protocol, an HTTP proxy can't help. That's what QGTunnel is for.

QGTunnel is a lightweight binary that wraps your application process. It opens a local socket that mirrors the remote TCP server, then forwards all traffic through QuotaGuard's proxy infrastructure. Your outbound connection exits from your two dedicated static IPs.

The key thing: with transparent mode enabled, your connection strings don't change. QGTunnel overrides DNS so your existing hostname resolves to localhost, and the tunnel handles the rest.

How QGTunnel Works

When QGTunnel starts, it opens a socket on localhost that looks like the TCP server on the remote end. The socket listens on a port you specify (or the same port as the remote destination if you don't specify one).

When your application connects to that socket, QGTunnel takes the traffic, forwards it through QuotaGuard's proxy, and delivers it to the final destination. The remote server sees the connection coming from your static IP.

There are two modes for how your application connects to the tunnel:

Transparent mode overrides DNS for the remote hostname to resolve to 127.0.0.1. Your application connects to hostname.for.your.server.com as usual, but DNS resolves it to localhost where QGTunnel is listening. Your code doesn't change. This is the recommended mode when you're using hostnames.

Non-transparent mode requires you to change your application to connect to localhost (or 127.0.0.1) on the tunnel's local port instead of the remote destination. Use this when your remote destination is an IP address rather than a hostname, since there's no DNS to override.

Setting It Up

Step 1: Download QGTunnel

Download and extract the binary into the root of your project:

curl https://s3.amazonaws.com/quotaguard/qgtunnel-latest.tar.gz | tar xz

This creates bin/qgtunnel in your project directory.

Step 2: Create the Tunnel in the Dashboard

Log into the QuotaGuard dashboard. Go to Setup, click QGTunnel Configuration, then Create a Tunnel.

You'll configure four fields:

Remote Destination: tcp://your-database.example.com:5432
Local Port: 5432
Transparent: true
Encrypted: false

Remote Destination is the TCP endpoint you need to reach. Use the format tcp://hostname:port. This could be a PostgreSQL database on port 5432, an FTP server on port 21, an SFTP server on port 22, or any TCP service.

Local Port is where QGTunnel listens on localhost. If the remote port is in the reserved range (0-1023) or already in use locally, pick a different local port. For example, if the remote server is on port 443, set local port to 4443 since 443 is likely already in use.

Transparent should be true when you're using a hostname for the remote destination. QGTunnel will override DNS so the hostname resolves to localhost. Set to false if you're using an IP address.

Encrypted adds end-to-end encryption through the tunnel. If your protocol already handles encryption (HTTPS, SFTP, TLS-enabled database connections), leave this false. Enable it for unencrypted protocols like plain FTP where you want encryption in transit.

Step 3: Update Your Startup Command

Prepend bin/qgtunnel to your application's startup command. QGTunnel wraps your process and sets up the tunnels before your app starts.

If you're using a Procfile:

# Before
web: your-application your arguments

# After
web: bin/qgtunnel your-application your arguments

On Heroku, if you don't have a Procfile, Heroku uses a default startup based on your framework. Check the Overview tab of your app in the Heroku dashboard under "Dyno Information" to see what command it's running, then create a Procfile with that command prepended by bin/qgtunnel.

Step 4: Set the Environment Variable

Set QUOTAGUARDSTATIC_URL to your QuotaGuard connection URL from the Setup page in the dashboard.

If you added QuotaGuard as an add-on from a cloud provider (Heroku, Azure, CloudFoundry, AWS, IBM Cloud), this is usually set automatically.

QGTunnel handles converting the HTTP URL to the SOCKS5 URL internally, so either connection URL format works.

Step 5: Commit and Deploy

Add these files to your repository:

bin/qgtunnel

If you're using transparent mode, also add:

vendor/nss_wrapper/libnss_wrapper.so

The NSS wrapper library is what allows QGTunnel to override DNS resolution for transparent mode.

If you're not using transparent mode, set the environment variable QGTUNNEL_DNSMODE=DISABLED to avoid an error message in your logs.

Step 6: Download the Configuration File

This step is important. By default, QGTunnel fetches its tunnel configuration from the QuotaGuard API at startup. If the QuotaGuard website is down for maintenance when your app restarts, the tunnel won't configure.

Download the configuration file from the dashboard (there's a "Download Configuration" button on the Tunnels page). Save it as .qgtunnel in the root of your project. Commit it.

With the local config file, your app doesn't depend on the QuotaGuard website being available during startup.

Alternatively, you can put the configuration contents in a QGTUNNEL_CONFIG environment variable.

Common Use Cases

Database Connections (PostgreSQL, MySQL, MongoDB)

Your database is behind a firewall that requires IP whitelisting. Set up a tunnel with the database hostname and port:

Remote Destination: tcp://db.example.com:5432
Local Port: 5432
Transparent: true
Encrypted: false

Your database connection string stays the same. QGTunnel intercepts the DNS for db.example.com, routes the traffic through the static IP, and the database firewall sees a whitelisted address.

If the database connection already uses TLS (which it should), leave encrypted mode off. The TLS encryption handles security. QGTunnel just handles the routing.

FTP Servers

FTP is a common case because many legacy systems still use it, and FTP servers almost always use IP-based access control.

Remote Destination: tcp://ftp.partner.com:21
Local Port: 2121
Transparent: true
Encrypted: true

Note encrypted mode is true here. Plain FTP sends credentials and data unencrypted. Enabling encrypted mode adds a layer of encryption through the tunnel.

Local port is 2121 because port 21 is in the reserved range.

SFTP

SFTP is already encrypted, so you don't need QGTunnel's encryption layer:

Remote Destination: tcp://sftp.partner.com:22
Local Port: 2222
Transparent: true
Encrypted: false

HTTPS When You Can't Use HTTP Proxy

Sometimes HTTP proxy configuration isn't possible. The library doesn't support it, or the TLS certificate validation requires the original hostname in the request. QGTunnel handles this:

Remote Destination: tcp://api.partner.com:443
Local Port: 4443
Transparent: true
Encrypted: false

Transparent mode is important here. HTTPS certificates are signed for the hostname. Your application still connects to api.partner.com, but on port 4443. The TLS handshake works because the hostname matches the certificate. QGTunnel routes the encrypted traffic through the static IP.

Debugging

If something isn't working, set the environment variable:

QGTUNNEL_DEBUG=true

Restart your application and watch the logs. QGTunnel will output detailed information about tunnel setup, DNS overrides, and connection routing.

By default, QGTunnel logs fatal errors only. Debug mode gives you the full picture.

When sending logs to QuotaGuard support, redact your connection URL since it contains your password.

Heroku-Specific Notes

On Heroku, you can open the QuotaGuard dashboard directly from the CLI:

heroku addons:open quotaguardstatic

Or click QuotaGuard Static on the Resources tab of your app in the Heroku dashboard.

The QUOTAGUARDSTATIC_URL environment variable is set automatically when you add the add-on.

Getting Started

Sign up for QuotaGuard Static. Create your tunnel in the dashboard. Download the binary, wrap your startup command, and deploy.

If you need end-to-end encryption for compliance (HIPAA, PCI-DSS), QuotaGuard Shield starts at $29/month with SSL passthrough.

QuotaGuard Static starts at $19/month.

QuotaGuard Static IP Blog

Practical notes on routing cloud and AI traffic through Static IPs.

Reliability Engineered for the Modern Cloud

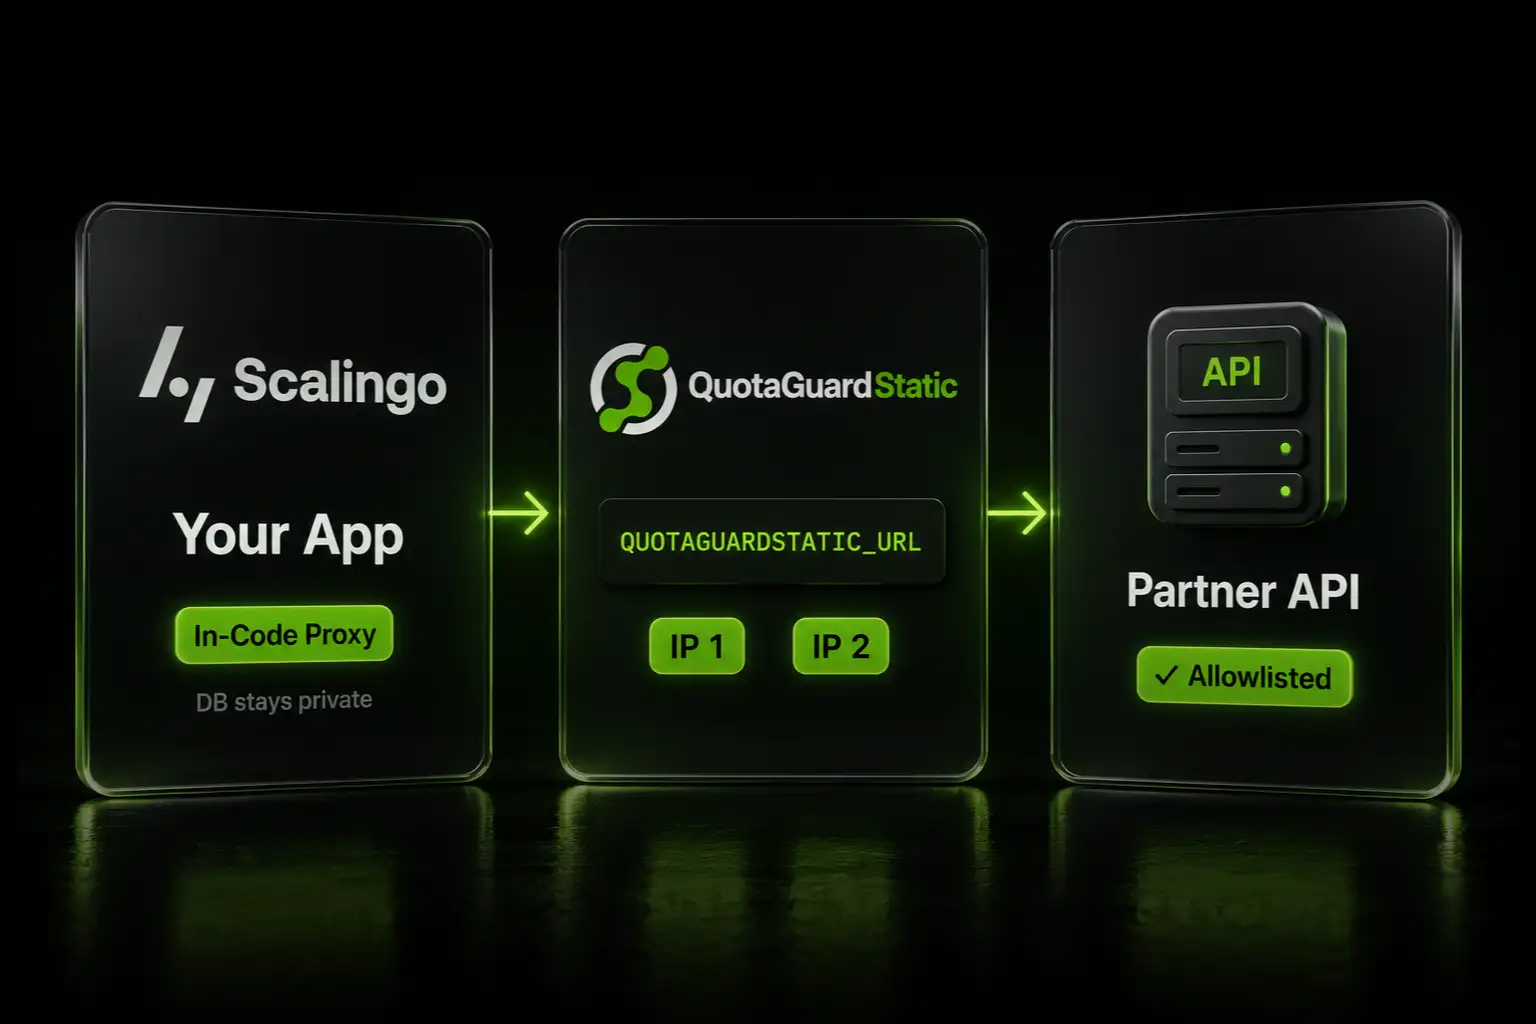
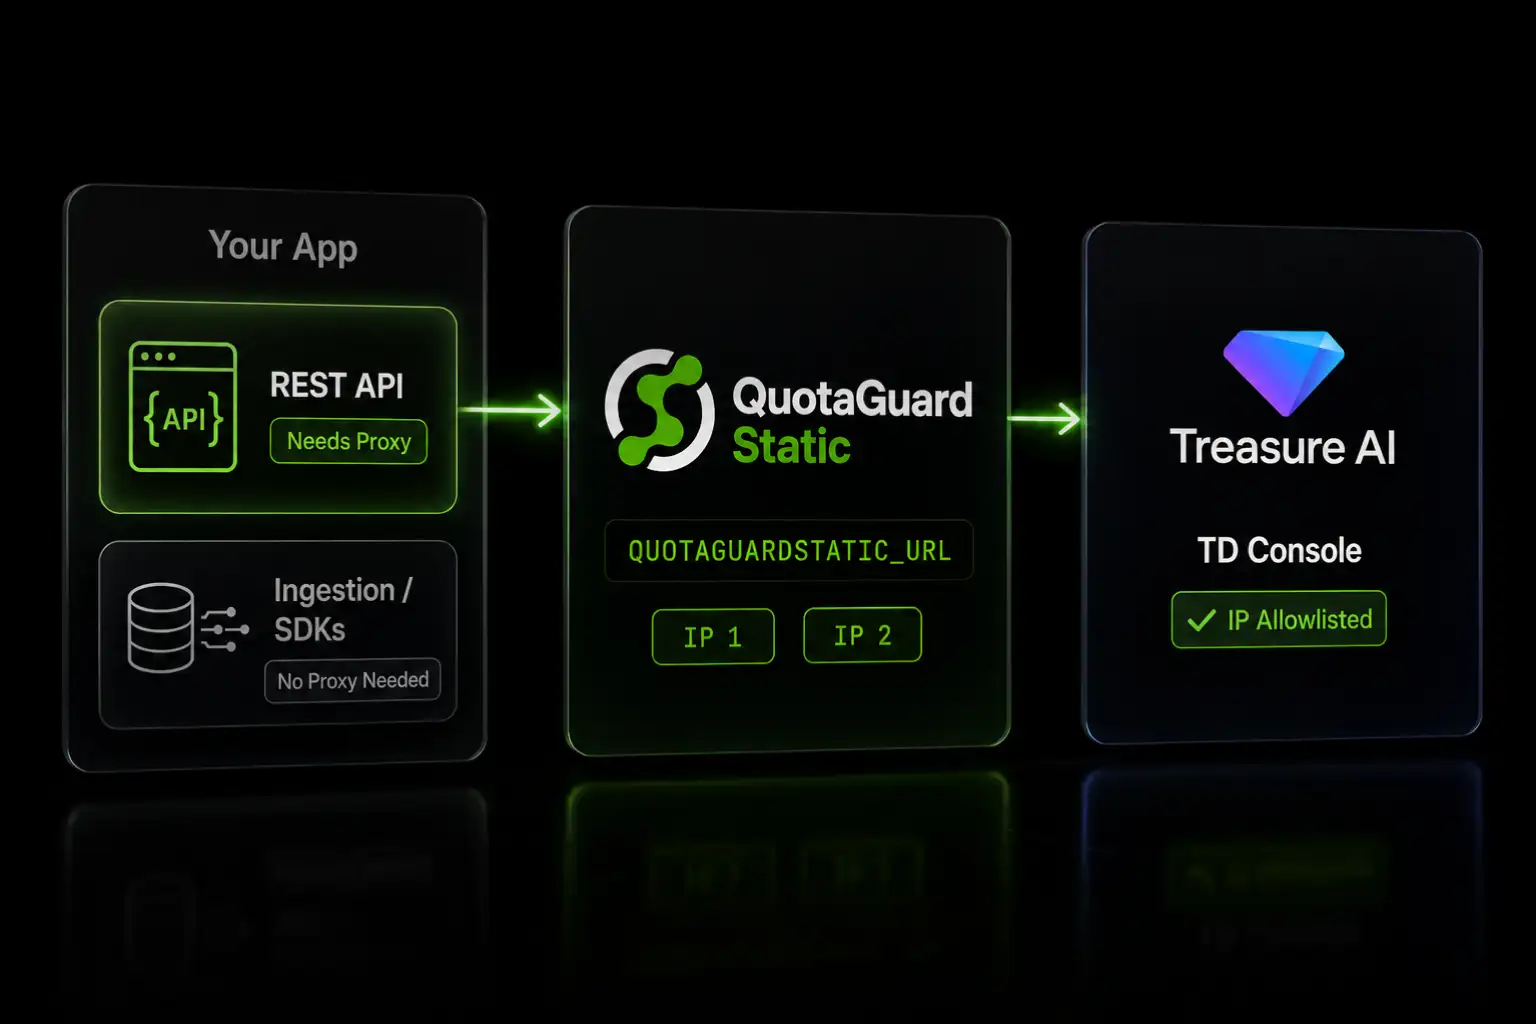
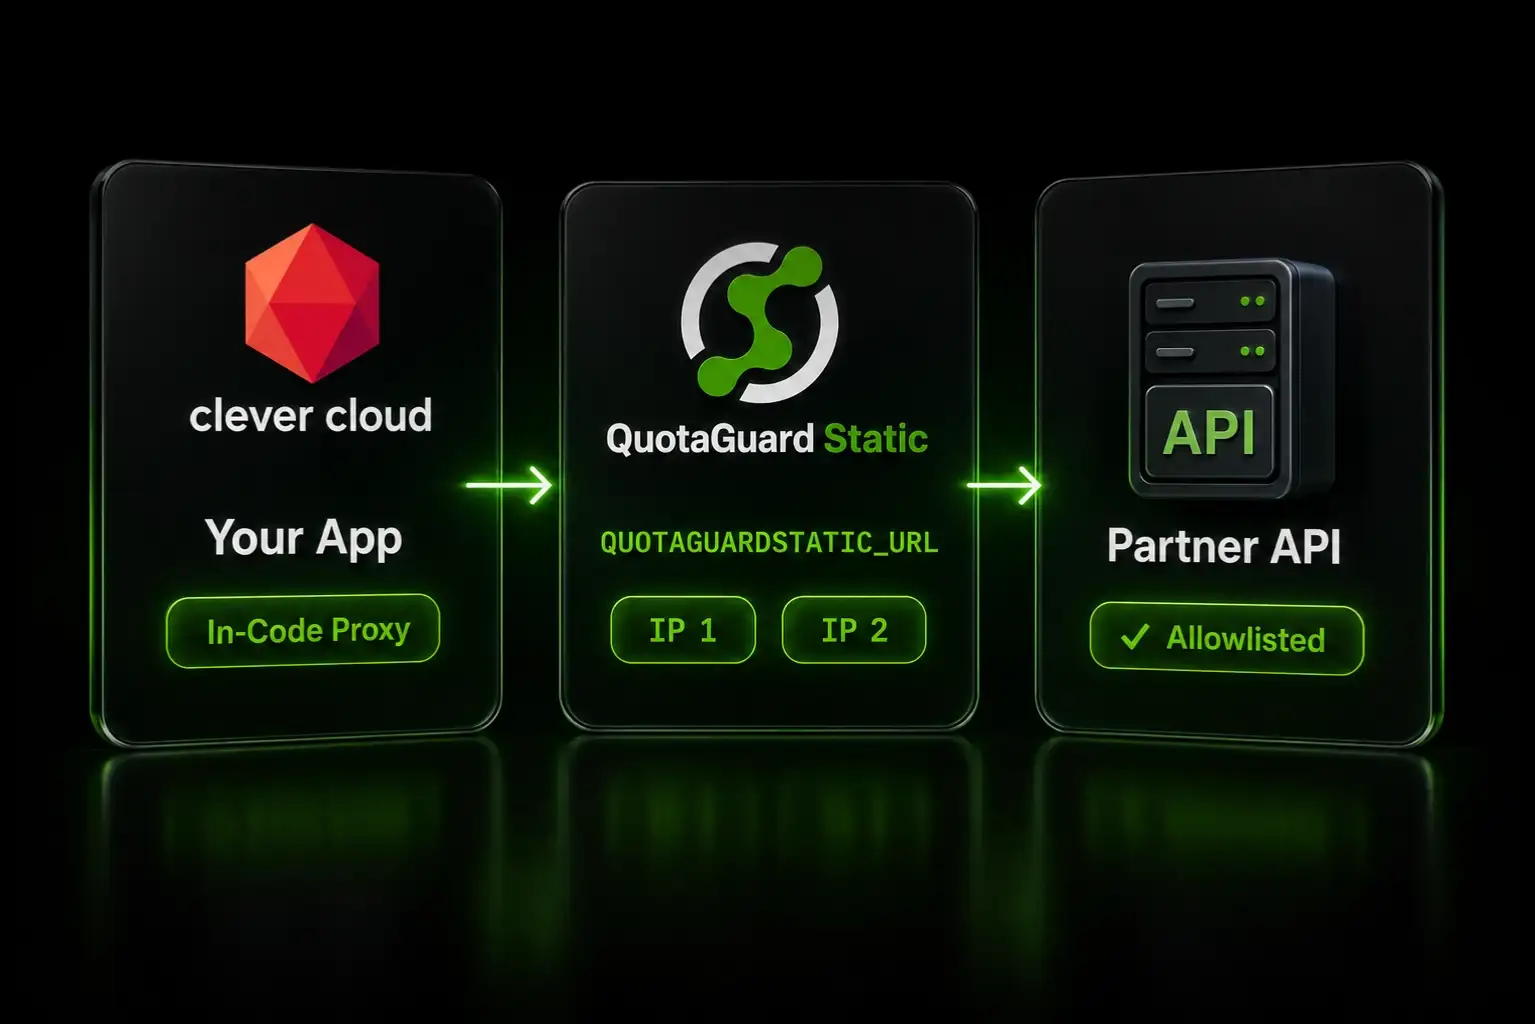
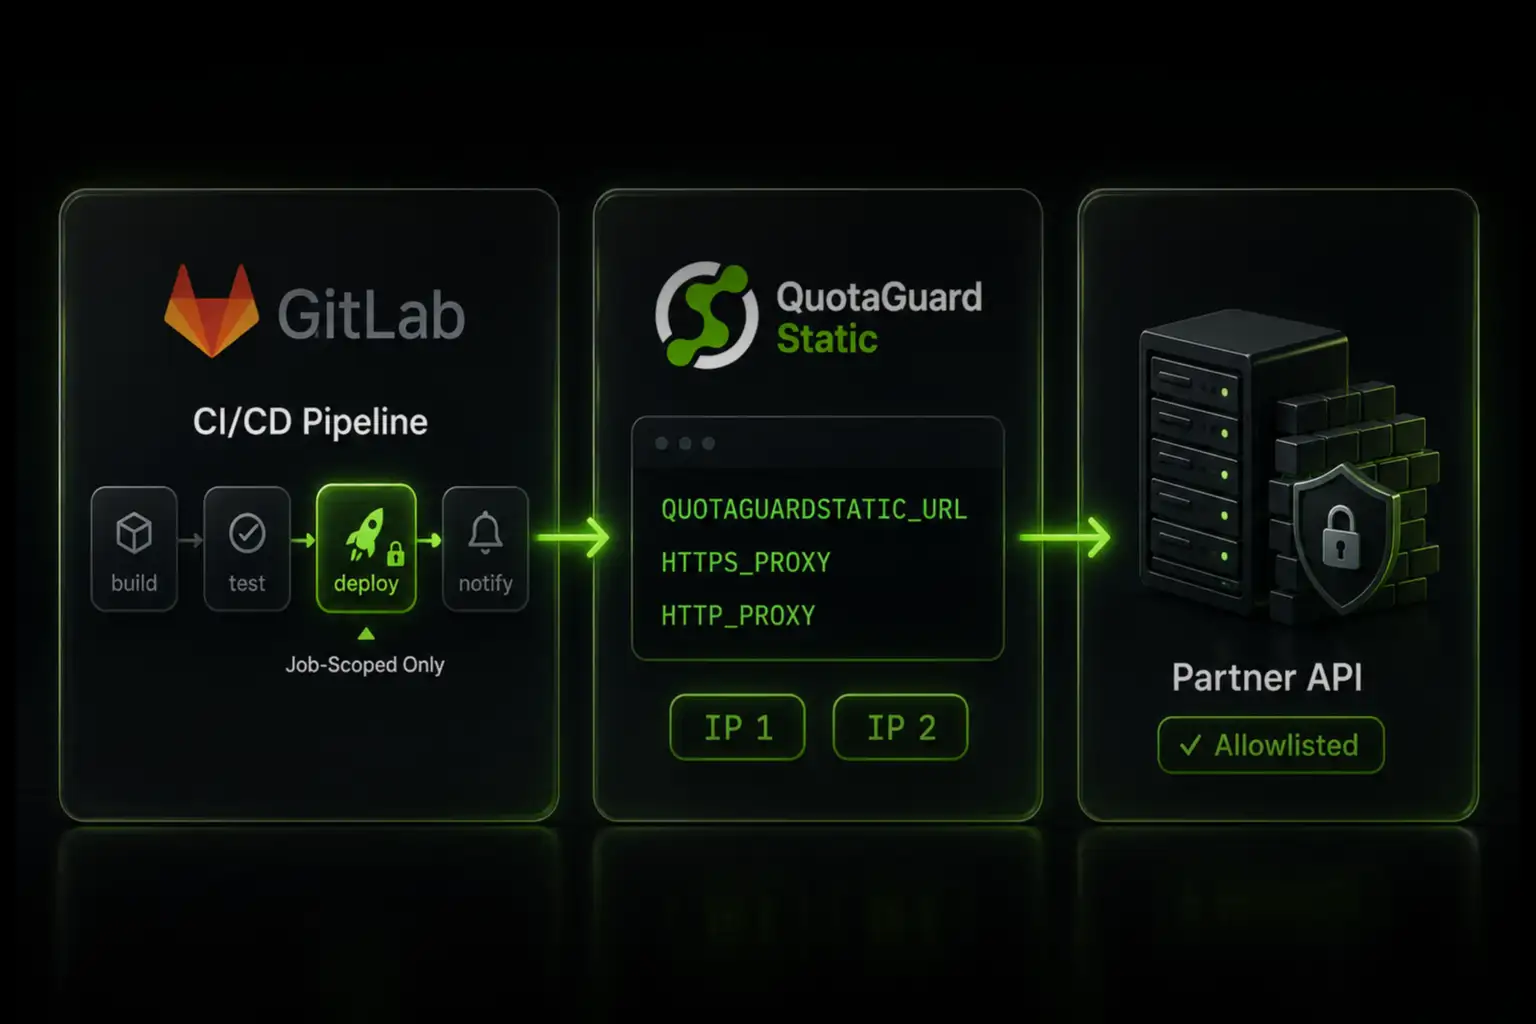
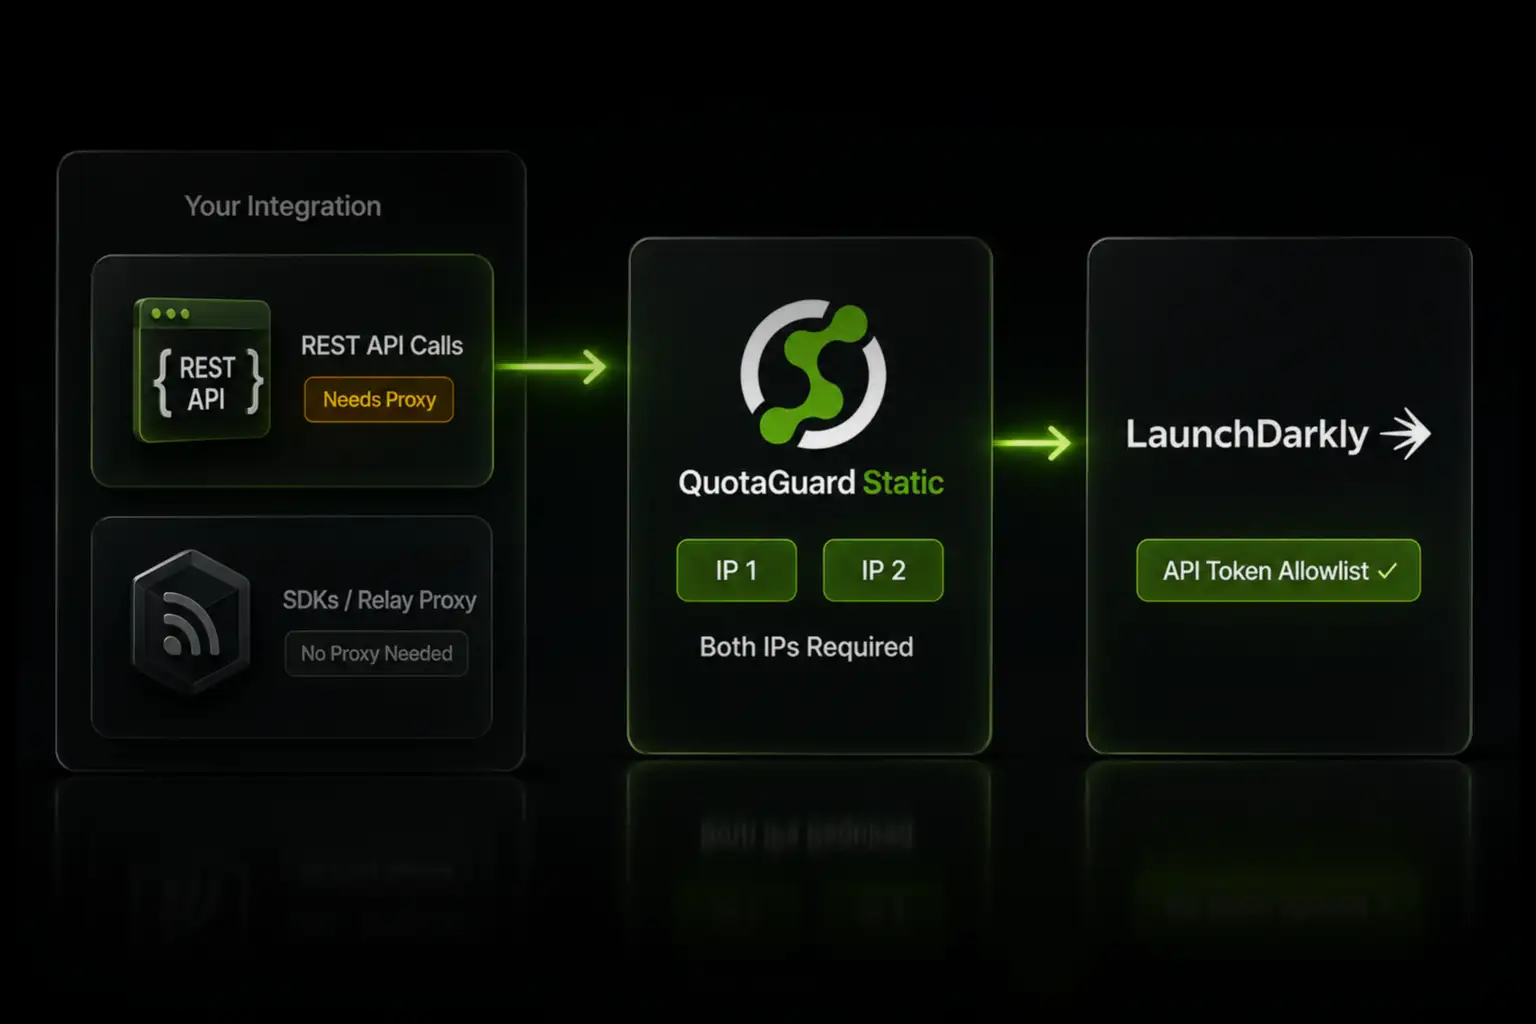
For over a decade, QuotaGuard has provided reliable, high-performance static IP and proxy solutions for cloud environments like Heroku, Kubernetes, and AWS.

Get the fixed identity and security your application needs today.