Accessing an FTP server from a Static IP in PHP
Table of contents
We strongly suggest users go with the SOCKS proxy using our QGTunnel software.
Here are some setup instruction to get you started:
Get Started with the SOCKS5 Proxy Utilizing QGTunnel
1) Download QGTunnel
Download and extract the qgtunnel package in the root directory of your app:
$ curl https://s3.amazonaws.com/quotaguard/qgtunnel-latest.tar.gz | tar xz
2) Setup the Tunnel
Login to our Admin Dashboard and go the Tunnels page to setup the tunnel.
Click Create a Tunnel. You should reach this screen below.
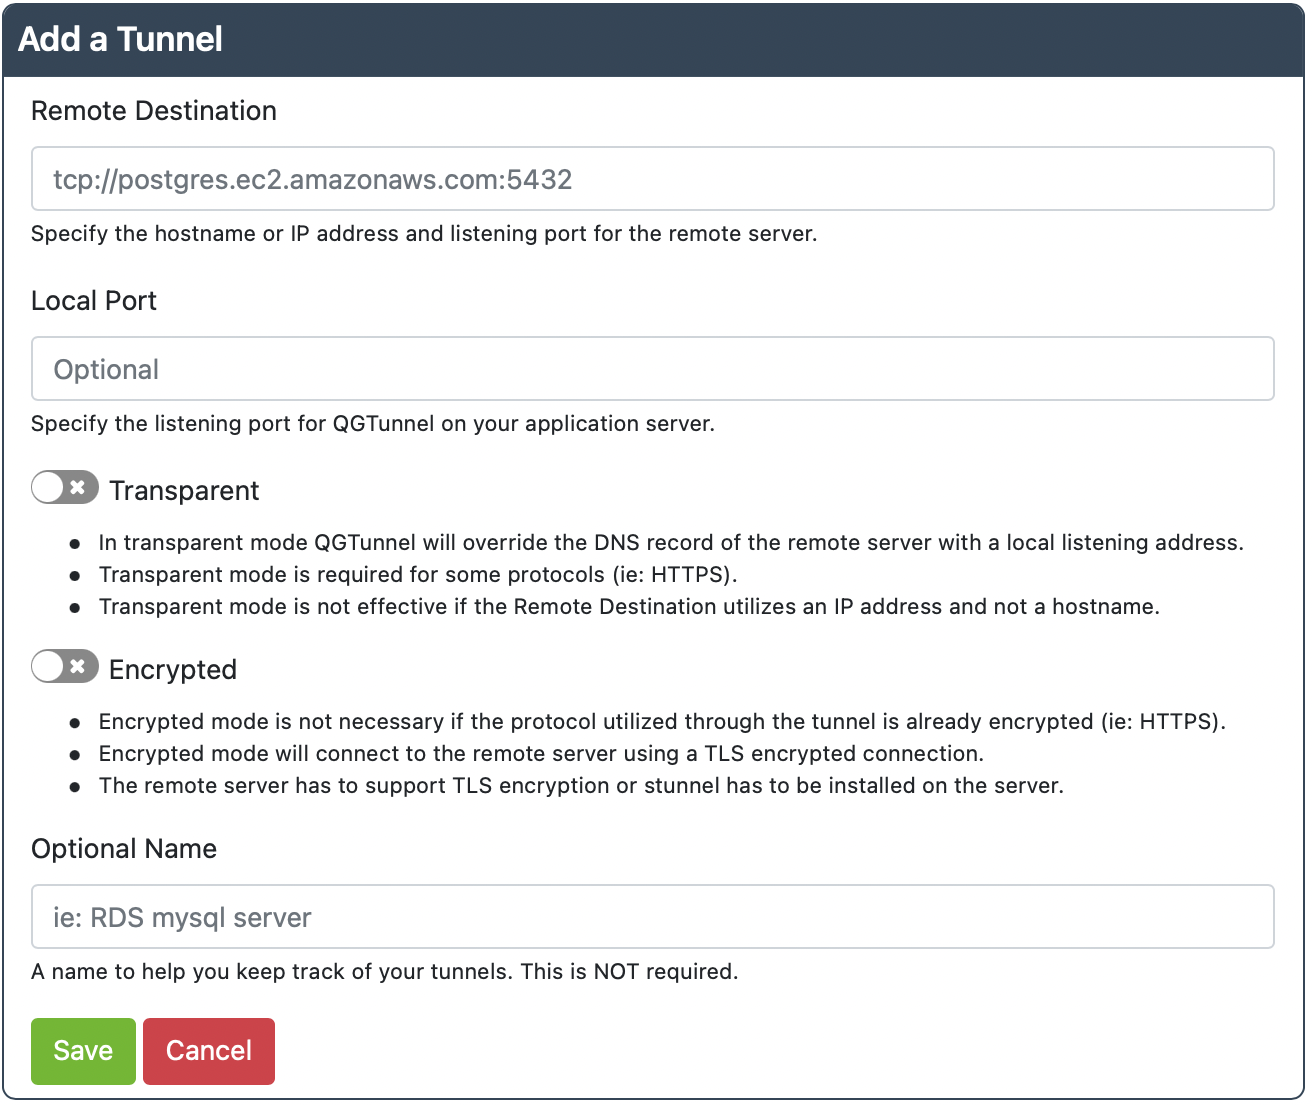
Remote Destination: tcp://hostname.for.your.server.com:22
Local Port: 2222
Transparent: true
Encrypted: false
This setup assumes that the remote SFTP server is located at hostname.for.your.server.com and is listening on port 22. This is usually the default port.
The Local Port is the port number that QGTunnel will listen on. In this example, we set it to 2222, because port 22 is probably in use on the localhost and it is also in the reserved port range (0-1023).
Transparent Mode allows QuotaGuard to override the DNS for hostname.for.your.server.com to 127.0.0.1, which redirects traffic to the QGTunnel software. This means you can connect to either hostname.for.your.server.com or 127.0.0.1 to connect through the QGTunnel.
More information is available on transparent mode as you follow along in these instructions.
Encrypted mode is disabled because SFTP is already encrypted and you will not want to waste your time setting up additional end-to-end encryption.
3) Change Your Code to Connect Through the Tunnel (maybe)
With transparent mode you will only have to change to connect to port 2222 instead of 22. You can also connect to 127.0.0.1:2222.
Without transparent mode, you will want to connect to 127.0.0.1:2222.
4) Change your Procfile
Heroku Users: You have a procfile even if it’s not explicitly in your code base. To find it, log into the Heroku dashboard, click on the Resources tab, and you will see a list of your dyno processes. The text you see (like web npm start) next to each one acts as your Procfile if you do not have one explicitly in your code base.
Modify your app Procfile to prepend the QGTunnel application to your standard commands:
Before:
web: your-application your arguments
After:
web: bin/qgtunnel your-application your arguments
5) Setup the environment variable QUOTAGUARDSTATIC_URL to be equal to your Connection URL in the Setup page of our dashboard.
If you added us from a cloud provider (Azure, Cloudfoundry, Heroku, AWS, IBM Cloud, Pivotal, etc) then this is usually done for you.
Please note that QGTunnel handles converting the HTTP URL and port to the SOCKS5 URL and port. So either of the connection URLs is fine.
6) Deploy
Commit and deploy your changes. Be sure to add bin/qgtunnel.
If you are using transparent mode, be sure vendor/nss_wrapper/libnss_wrapper.so is also committed.
7) (Optional) If problems arise…
By default all fatal errors encountered by the qgtunnel will be logged to your logs.
If this information is not enough you can enable verbose output mode by setting QGTUNNEL_DEBUG environment variable to true and restart the application while watching the logs.
Send any information in the logs (please redact any credentials, including your QuotaGuard connection URL) to our Support so we can help figure out the problem with you.
8) IMPORTANT: Harden Your Setup
This step is highly recommended as we do not have any SLA on our website, which can be out due to maintenance at any time.
By default qgtunnel will try to fetch configuration from the QuotaGuard API, but it also supports local configuration.
You can download a configuration file from the Dashboard by pressing Download Configuration on the Tunnels page.
Place the downloaded file into the root directory of your project under the .qgtunnel filename, commit and deploy.
With this file your application will not depend on the availability of our website during application startup.
Getting Help
The SOCKS wrapper is not straight forward to set up, or debug, so if you have any issues just get in contact with our Support and we’ll help you out.