SOCKS Quick Start Guide
Table of contents
SOCKS5 is a very flexible TCP level tunneling protocol which works on a per host basis and is compatible with all programming environments.
If you’re not sure whether to use the SOCKS proxy, then please check out our Choosing HTTP vs SOCKS article.
Please note : This product includes software developed by Inferno Nettverk A/S, Norway. For more information on their software Dante, please see https://www.inet.no/dante/.
QuotaGuard provides three ways to setup SOCKS5 proxy integration within your app:
1) QuotaGuard Tunnel (qgtunnel), process-based tunneling program. (recommended)
2) QuotaGuard Socksify (qgsockify) script, routing-based tunneling program.
3) Framework specific support for SOCKS5.
QGTunnel is an extremely versatile wrapper script for your process.
- It allows you to map one or more local ports to route through the QuotaGuard proxy servers.
- It supports a DNS override mode for protocols that require the hostname stay the same (ie: HTTPS) or to minimize the impact on the code.
- QGTunnel also supports end-to-end encryption of your tunnel data for protocols that are not encrypted (ie: redis).
We recommend QGTunnel - unless you need to route all traffic within the app through the SOCKS5 proxy.
QGSocksify is a routing-based tunneling program. It allows for all or some of the outgoing traffic to be routed through the proxy server based on the destination IP or IP range.
Additionally, many languages support SOCKS5 proxies natively or via a add-on package.
Please note: The wrapper is not compatible with OSX or Windows. We recommend using a Virtual Machine running Ubuntu for development testing if your main development environment does not run Linux.
Get Started with the SOCKS5 Proxy Utilizing QGTunnel
1) Download QGTunnel
Download and extract the qgtunnel package in the root directory of your app:
$ curl https://s3.amazonaws.com/quotaguard/qgtunnel-latest.tar.gz | tar xz
2) Setup the Tunnel
Login to our Admin Dashboard and go the Tunnels page to setup the tunnel.
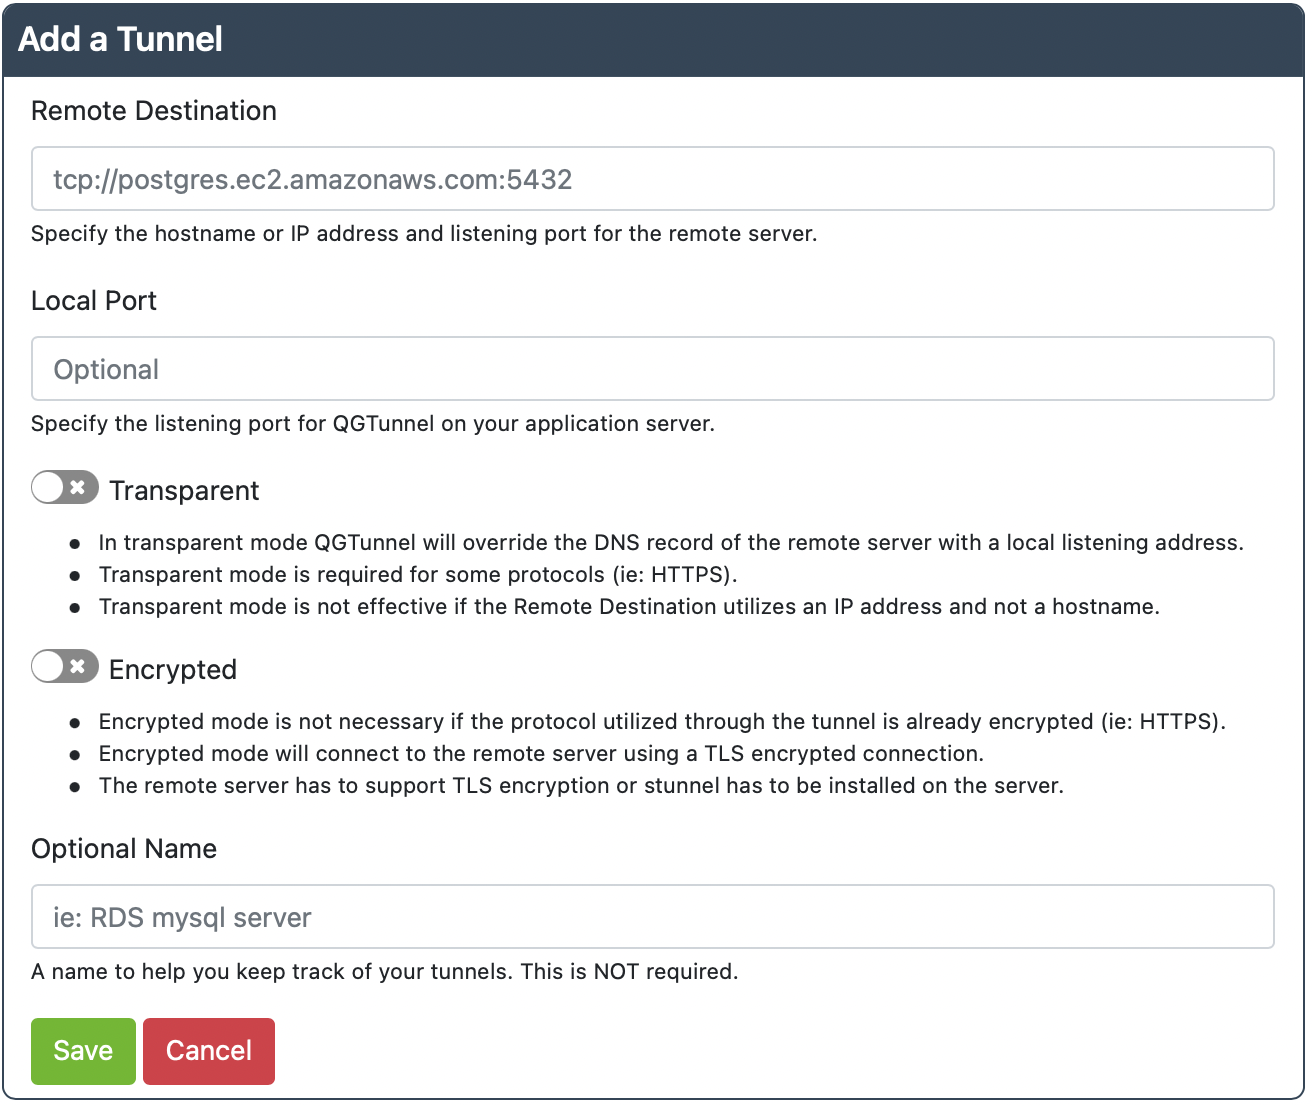
Click Create a Tunnel. You should reach this screen below.

Remote Destination: tcp://hostname.for.your.server.com:3306
Local Port: 3306
Transparent: true
Encrypted: false
This setup assumes that your server is located at “hostname.for.your.server.com” and is listening on port 3306 (the default MySQL port).
Use the same port for the local port, unless you are using that port or it is below 1024, then you will have to change this to some other port (say 3307).
Transparent Mode allows QuotaGuard to override the DNS for hostname.for.your.server.com to 127.0.0.1, which redirects traffic to the QGTunnel software. This means you can connect to either hostname.for.your.server.com or 127.0.0.1 to connect through the QGTunnel.
More information is available on transparent mode as you follow along in these instructions.
Encrypted Mode can be used to encrypt data end-to-end, but if your protocol is already encrypted then you don’t need to spend time setting it up. We have more details on end-to-end encryption as you follow along in these instructions.
Creating the tunnels in the dashboard is for convenience. Please see the last step (Harden Your Setup) for how to remove this dependency from your system.
3) Change Your Code to Connect Through the Tunnel (maybe)
You may have to change your code to connect through QGTunnel.
With transparent mode, and when using the same local and remote port, you should not have to change your code.
Without transparent mode, you will want to connect to 127.0.0.1:3306 (like in this example). If you changed the local port, then you will need to change the port number to match.
4) Change your Procfile
Heroku Users: You have a procfile even if it’s not explicitly in your code base. To find it, log into the Heroku dashboard, click on the Resources tab, and you will see a list of your dyno processes. The text you see (like web npm start) next to each one acts as your Procfile if you do not have one explicitly in your code base.
Modify your app Procfile to prepend the QGTunnel application to your standard commands:
Before:
web: your-application your arguments
After:
web: bin/qgtunnel your-application your arguments
5) Setup the environment variable QUOTAGUARDSTATIC_URL to be equal to your Connection URL in the Setup page of our dashboard.
If you added us from a cloud provider (Azure, Cloudfoundry, Heroku, AWS, IBM Cloud, Pivotal, etc) then this is usually done for you.
Please note that QGTunnel handles converting the HTTP URL and port to the SOCKS5 URL and port. So either of the connection URLs is fine.
6) Deploy
Commit and deploy your changes. Be sure to add bin/qgtunnel.
If you are using transparent mode, be sure vendor/nss_wrapper/libnss_wrapper.so is also committed.
7) (Optional) If problems arise…
By default all fatal errors encountered by the qgtunnel will be logged to your logs.
If this information is not enough you can enable verbose output mode by setting QGTUNNEL_DEBUG environment variable to true and restart the application while watching the logs.
Send any information in the logs (please redact any credentials, including your QuotaGuard connection URL) to our Support so we can help figure out the problem with you.
8) IMPORTANT: Harden Your Setup
This step is highly recommended as we do not have any SLA on our website, which can be out due to maintenance at any time.
By default qgtunnel will try to fetch configuration from the QuotaGuard API, but it also supports local configuration.
You can download a configuration file from the Dashboard by pressing Download Configuration on the Tunnels page.
Place the downloaded file into the root directory of your project under the .qgtunnel filename, commit and deploy.
With this file your application will not depend on the availability of our website during application startup.
Getting Help
The SOCKS wrapper is not straight forward to set up, or debug, so if you have any issues just get in contact with our Support and we’ll help you out.