Get a Static IP for Bitstamp API Whitelisting


Route your Bitstamp bot through QuotaGuard Shield, capture both static IPs, and add them to your API key's whitelist before activating the key.
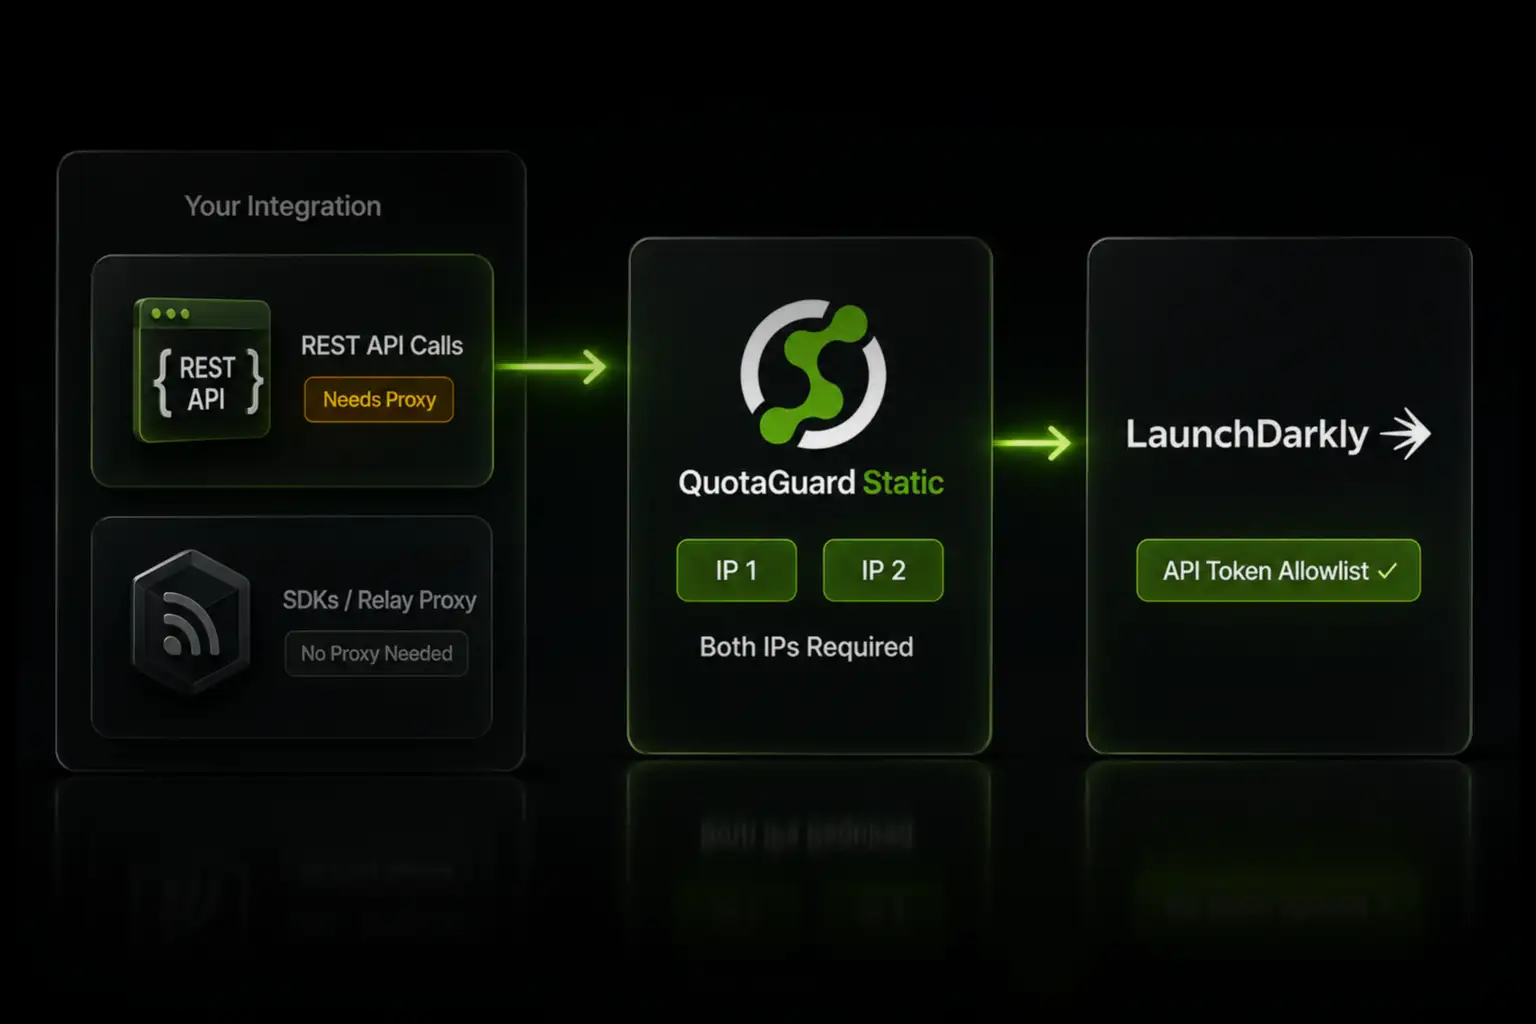
Bot platforms tell users to whitelist static IPs with Bitstamp. None of them tell you where to get a static IP from when your bot runs on Heroku, Railway, AWS Lambda, Render, or any other cloud platform handing out rotating egress addresses. That's the gap QuotaGuard Shield fills. Two minutes of setup, two static IPs ready to paste into Bitstamp's whitelist field.
Bitstamp Enforces an IP Whitelist on Every API Key You Configure It For
Bitstamp's API key creation form includes an IP whitelist option. Once configured, only requests originating from those IPs reach the API. Calls from any other address get rejected at the network layer before authentication.
The whitelist is opt-in. A new API key with no whitelist configured works from any IP that has the credentials. That's a security hole. If your API secret leaks (and they do leak: GitHub commits, log files, Slack pastes, support tickets), an attacker with the credentials has full access to whatever the key permits. Whitelisting collapses that risk to zero unless the attacker is also on your network.
Every serious bot operator should turn the whitelist on. The blocker for cloud-based bots has always been: how do you whitelist a static IP when your platform hands you a different IP every deploy? You don't. You route through a proxy.
QuotaGuard Shield Gives Your Bot Two Static IPs Bitstamp Will Accept
QuotaGuard Shield is the right product for Bitstamp because of how Shield handles encryption. Shield uses SSL passthrough. The TLS connection runs end-to-end between your bot and Bitstamp's API. QuotaGuard routes the packets but never decrypts them. Your API secret, signed request payloads, and order data are never visible to QuotaGuard's infrastructure.
That matters for crypto. Trading credentials and order data are exactly the kind of payload you want kept inside the encrypted channel. Shield's design satisfies the most strict reading of "no third party in the middle" that compliance and risk teams ask about.
QuotaGuard Shield accounts come with two static IPs by default, load-balanced. Both are active at any moment. That maps cleanly onto Bitstamp's whitelist, which accepts multiple IPs per key.
Configure Your Bot to Route Through QuotaGuard Shield
One environment variable. The proxy URL goes into your HTTP client config:
QUOTAGUARDSHIELD_URL=https://username:password@us-east-shield-01.quotaguard.com:9294
Replace us-east with the region closest to where your bot runs. The full region list is in the QuotaGuard docs.
For Python bots using ccxt (the most common pattern in retail crypto trading):
import os
import ccxt

bitstamp = ccxt.bitstamp({
    'apiKey': os.environ['BITSTAMP_API_KEY'],
    'secret': os.environ['BITSTAMP_API_SECRET'],
    'uid': os.environ['BITSTAMP_USER_ID'],
})

bitstamp.proxies = {
    'http': os.environ['QUOTAGUARDSHIELD_URL'],
    'https': os.environ['QUOTAGUARDSHIELD_URL'],
}

balance = bitstamp.fetch_balance()
For Python bots using requests directly with Bitstamp's signed REST API:
import os
import requests

proxies = {
    'http': os.environ['QUOTAGUARDSHIELD_URL'],
    'https': os.environ['QUOTAGUARDSHIELD_URL'],
}

response = requests.post(
    'https://www.bitstamp.net/api/v2/balance/',
    proxies=proxies,
    headers=signed_headers,
    data=signed_payload,
)
For Node.js bots using axios:
const axios = require('axios');
const { HttpsProxyAgent } = require('https-proxy-agent');

const agent = new HttpsProxyAgent(process.env.QUOTAGUARDSHIELD_URL);

const response = await axios.post(
  'https://www.bitstamp.net/api/v2/balance/',
  signedPayload,
  {
    httpsAgent: agent,
    headers: signedHeaders,
  }
);
Refer to Bitstamp's API documentation for the request signing scheme, which is independent of the proxy configuration.
Capture Both QuotaGuard IPs Before You Create the Bitstamp Key
The two QuotaGuard IPs are load-balanced. Run a curl test through the proxy at least three or four times to make sure you've seen both:
curl -x $QUOTAGUARDSHIELD_URL https://api.ipify.org
curl -x $QUOTAGUARDSHIELD_URL https://api.ipify.org
curl -x $QUOTAGUARDSHIELD_URL https://api.ipify.org
curl -x $QUOTAGUARDSHIELD_URL https://api.ipify.org
You should see two distinct IPs alternating. Save both. They go into Bitstamp's whitelist field.
If Bitstamp's whitelist field accepts comma-separated input, paste them as IP1,IP2. If the form provides separate IP entry rows or an "Add IP" button, enter each IP in its own field. Either way, both addresses must land on the whitelist or roughly half your bot's requests will be rejected when the load balancer routes through the IP that's not allowlisted.
Single Key With Both IPs Is the Default Pattern
Most bot setups use one Bitstamp API key with both QuotaGuard IPs whitelisted on it. The bot reads one set of credentials and makes requests through the proxy. Whichever of the two IPs the load balancer picks for a given request, Bitstamp accepts it. This is the simplest pattern and it works.
Two Keys (One IP Per Key, Round-Robin in Code) Is More Resilient
Some operators run two API keys instead, one per IP, and alternate between them in their bot code. This setup is harder to wire up but has real advantages worth knowing about:
- Key rotation without downtime. Rotate one key while the other handles live traffic. With a single shared key, rotation means a brief outage.
- Independent rate limits. Bitstamp's rate limits apply per key. Two keys gives the bot twice the headroom for high-frequency strategies.
- Failure isolation. If one key gets flagged, suspended, or hits a permission misconfiguration, the other keeps the bot running until you investigate.
- Cleaner audit trails. Bitstamp shows API activity per key. Per-IP keys make it trivial to see which IP placed which order.
QuotaGuard tip: pair API IP whitelisting with Bitstamp's withdrawal address whitelist. Even if your API key gets compromised, an attacker cannot drain your account because withdrawals only go to your pre-approved wallet addresses. The two-layer setup is the standard for any bot operator running on infrastructure they don't fully control. Bitstamp's writeup of the withdrawal whitelist feature.
Restrict the API Key to Read and Trade. Never Withdraw.
Bitstamp's API key permissions are granular. The three primary options are:
- Read. Account Balance, User Transactions. The bot can see what's in the account and what's been traded.
- Trade. Place and cancel orders. The bot can move money between assets within the account.
- Withdraw. Send funds out of the account. The bot can move money off the exchange entirely.
For an automated trading bot, enable Read and Trade. Do not enable Withdraw. There is almost no legitimate reason a trading bot needs withdrawal permissions, and enabling it removes the most important safety net you have if the API key is ever compromised. Bot platforms that ask for withdrawal permissions should be approached with extreme caution.
For portfolio trackers and tax tools, create a separate read-only key. Enable only the read permissions. Never give a tax tool the ability to place orders.
Activate the Key Through Bitstamp's Email Confirmation
After you create the key, Bitstamp sends an activation email. The API key does not work until you click the link in that email. This is intentional and prevents anyone with access to your Bitstamp session from creating working keys without also having access to the email account.
Two consequences worth planning for:
- Test the key immediately after activation. If something is wrong with the whitelist or permissions, you want to find out at setup time, not in production.
- Save the API secret immediately when Bitstamp shows it during creation. The secret is shown once. If you close that screen without saving it, you have to delete the key and create a new one.
QuotaGuard Shield Pricing Starts at $29/Month
QuotaGuard Shield direct plans:
- Starter: $29/month, 10 GB bandwidth
- Production: $59/month, 50 GB bandwidth
- Business: $109/month, 200 GB bandwidth
- Enterprise: $269/month, 1 TB bandwidth, dedicated IPs
For most retail crypto bots, Shield Production handles trading volume comfortably. Shield Enterprise gives you dedicated IPs that no other QuotaGuard customer shares, which is worth the upgrade if your security policy requires that no third party has ever used your egress addresses.
All plans include a 3-day trial. Enterprise trials run 7 days. Credit card required.
See the full breakdown at quotaguard.com/products/pricing.
Get Whitelisted Before You Run Live Capital Through the Bot
Two-minute QuotaGuard setup. Two IPs in Bitstamp's whitelist. Read and Trade permissions. Withdrawal address whitelist as the second layer. Email activation. That's the full security posture for a Bitstamp trading bot running on cloud infrastructure.
Provision QuotaGuard Shield, capture both IPs through the curl test against your real deployment environment, create your Bitstamp API key with the whitelist populated, set the permissions to Read and Trade only, click the activation link, and run a balance fetch as your first test. If the balance comes back, the chain works end to end and you can move to live trades.
QuotaGuard Static IP Blog
Practical notes on routing cloud and AI traffic through Static IPs.
.webp)